
In this tutorial, they will demonstrate how to add a dramatic rain effect to a photograph in Photoshop. While rain effects are not new to Photoshop, they will go a step further & show how to make the picture more photorealistic by adding reflections & small puddles. Let's start!
Tutorial Assets
The following assets were used in the work of the production of this tutorial. download them before you start or find options in the event that they are not available.
- Walk on pier
- Cloudy Scotland
1. Setting Up the Base
Step 1
Open Walk on pier in Photoshop. Double-click the layer to unlock it and name it "Base."The first step to add realistic rain is to have convincing clouds. Go to File > Place... and place Cloudy Scotland at the top of your canvas. You will require to stretch the picture a bit so the clouds fully cover the sky. To do so, hit CMD/CTRL + T to enter Free Transform mode and input 120% for the height. Hit enter to confirm, name the layer "Sky" and place it below your "Base" layer.

Step 2
Using your favourite gizmo, generate a choice of the sky (I used the Speedy Choice Gizmo). Select your "Base" layer, hit CMD/CTRL + G to group it, & generate a mask from the choice in order to hide the sky.

I recommend you take the time to refine your mask. This will help accomplish a photorealistic lead to the finish. To do so, select your group's mask and use a black or white Brush (B) to paint in and out the parts you desire.

Since the sky still has a tiny little bit of color, generate a Black & White modification layer to make sure it fits your base layer.

Step 3
When it rains, the air gets humid, leading to fog that hides far away elements. To do this, use a soft massive Brush with a grey color (#C3C3C3 in this case) & draw a straight line on the horizon (hold Shift when painting to draw in straight line). Set the layer opaqueness to 50%. You can then duplicate the layer (CMD/CTRL + J) & stretch it vertically to soften even more the fog. Name both layer "Fog" & place them below the group.

Finally, generate a Curves manipulation layer to darken the picture. Place it above everything else.

2. Generating the Rain
Step 1
The usual method to generate rain is to merge the Add Noise & the Motion Blur filter. Start by making a used layer (CMD/CTRL + Shift + N), then fill it with black (D, then Alt + Backspace), & then go to Filter > Noise > Add Noise. Scale the noise up to 400%.

Then go to Filter > Blur > Motion Blur and give the noise a slanted motion blur. Hit CMD/CTRL + M to raise the Curves modification panel and add contrast to your layer. Finally, switch your layer to Screen and name it "Rain."

Now the key to receive a more realistic & more fascinating is randomness. You see, rain doesn't usually fall in a superbly straight line because of the wind. To get this randomness, they will must repeat the method a few times with a varying size of grain & angle of motion blur. In this case, I did the method with noise scaled to 250% & with a 79 ° blur.

And once again, this time with a 600% scale and 60 ° blur.

Finally, I basically generated noise & darkened it a lot. Name this layer "Noise."

Step 2
Set all your "Rain" layers to Screen, and unhide them.

Now this is a bit much. To fix this, give each of the rain layer a mask, select it, and go to Filter > Render > Clouds. This will reduce the effect and give the rain a more randomness. Also, set the "Noise" layer to 20% opaqueness.

3. Water Puddles and Reflectivity
Step 1
We managed to generate the falling rain. However, our picture doesn't look realistic yet. Why is that? Well, when you look at rain images, you realise that the rain drops are usually barely visible. What is visible, however, is a darker, soaked & reflective ground, which is the most important & the hardest part of the method. The first part to do so is to isolate our image's floor. Using your favourite tool, generate & fill the floor with a thick color on a brand spanking new layer.

Once you are satisfied together with your work, CMD/CTRL + Click on the layer thumbnail to retrieve its choice, generate a new empty group & generate a mask out of the choice. Name the group "Floor Mask."

Step 2
Duplicate your "Base" layer and place it in your "Floor Mask" folder. Go to Filter > Filter Gallery and pick Bas Relief. Give it the values as indicated in the example below and press enter. Give it a Curves modification to darken it a tiny bit (you can clip it by holding Alt and clicking between the layers). Set the layer to Color Dodge.

Once again, we'll give the layer a cloudy mask in order to add randomness. Let's start by making a new layer filled with clouds. Hit CMD/CTRL + T & scale it down under the horizon. Still in the Free Transform mode, right-click & select Point of view. Move the bottom corner handles to roughly match the point of view of the planks. Hit CMD/CTRL + A to select everything, & CMD/CTRL + X to cut it. Give the layer you created in the last step a mask, select the mask in the Channels panel & paste the clouds in.

Step 3
Since our floor is soaked, it ought to reflect the things above it, including the sky. To do this, duplicate your "Sky" layer and place inside the "Floor Mask" folder. Flip it vertically (CMD/CTRL + T, right-click and pick Flip-Vertical) and set it to 15% opaqueness. Notice at this step I brought back the earlier Black & White filter above the "Pier" group.

Step 4
Now we'll require to retrieve the choice from the area between the sky & the floor. To do so, retrieve the choice from the "Floor Mask" group's mask (CMD/CTRL + Click). Then, invert the mask (Select > Inverse), & CMD/CTRL + Alt + Click on the "Pier" group's mask. With the choice active, duplicate (CMD/CTRL + J) your base layer in order to receive a duplicate of this particular area. Name the new layer "Reflection."

Now the next step is a small bit tricky. In order to help yourself, you ought to hide all effects. You can also generate a new layer below "Reflection", fill it with red (Edit > Fill) & set it to 50% opaqueness.

Flip your layer vertically & place it so the feet of the couple on the left match. Using the Rectangular Marquee Gizmo (M), generate a choice of the wall to the left & bring it up. With the choice still active, use the Skew transformation mode (CMD/CTRL+T, right-click > Skew) to make the reflection mirror the wall's point of view.

Repeat the process for the following wall.

Keep going until you get the following result.

Step 5

Using the Smudge Gizmo (located under the Blur tool), you can smudge back the parts of the reflections that are missing. For the area between the legs of the couple on the left, you can basically paint with a grey brush.

In this case, I also gave the layer a mask & softly painted out parts of the reflection. When you are done, you can bring back the effects & lower the layer opaqueness to 35%.

Step 6
We can enhance the floor a bit more. Select every layer below the "Black & White" layer, duplicate & merge them. Apply the Reticulation Filter (from the Filter Gallery) & give it the values as shown in the example. Hit CMD/CTRL + M to raise the Curves Panel & increase the layer's contrast a bit. Finally, place the layer inside the "Floor Mask" group & name it "Reticulation."

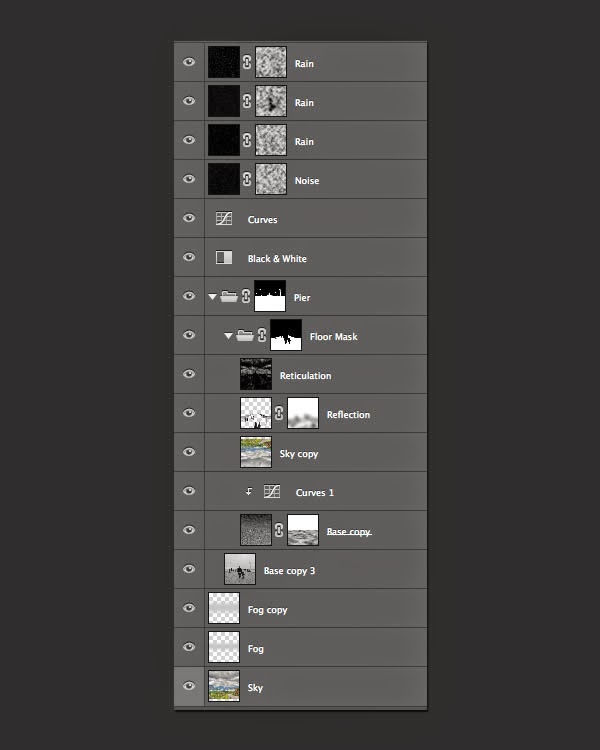
Voilà ! We are done! In case you missed anything, here is what your final layer setup should look like.
You can also compare the final picture with the base template & appreciate the formidable work you have done!

Conclusion
In this tutorial, they showed you how to quickly add a dramatic rain effect to your pics. In addition, they also showed you how to add reflections and puddles to make the effect more realistic.
0 comments:
Post a Comment